Difference between revisions of "Retain Publishing Indexer"
(→Automatic) |
(→Level 1) |
||
| Line 3: | Line 3: | ||
In this module you will learn: | In this module you will learn: | ||
| − | ::* | + | ::* Index Filtering |
| − | ::* | + | ::* Indexing Modes: Automatic or Manual |
| − | : | + | |
| + | ===Index Filtering=== | ||
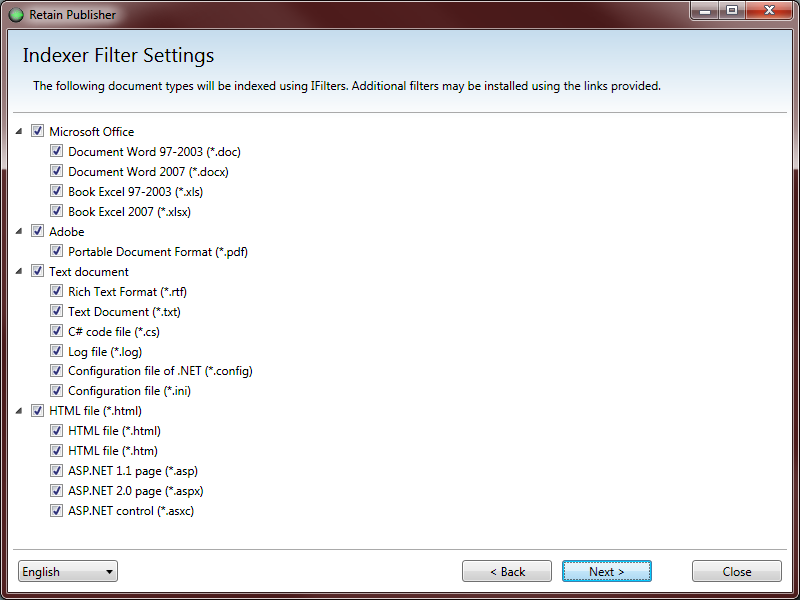
| + | In both the automatic and manual processes of the Indexer, there are Indexer Filter Settings. The last screen prior to retrieving messages will allow you to select, or deselect, any types of attachment types you wish to not index. This may be beneficial if you are only searching for a specific type of attachment and wish to leave the others out of your search. | ||
| + | |||
| + | [[File:3._Indexer_Filter_Settings.png||||border]] | ||
===Indexing Setup=== | ===Indexing Setup=== | ||
| Line 21: | Line 25: | ||
[[File:1.Automatic_Indexer.png||||border]] | [[File:1.Automatic_Indexer.png||||border]] | ||
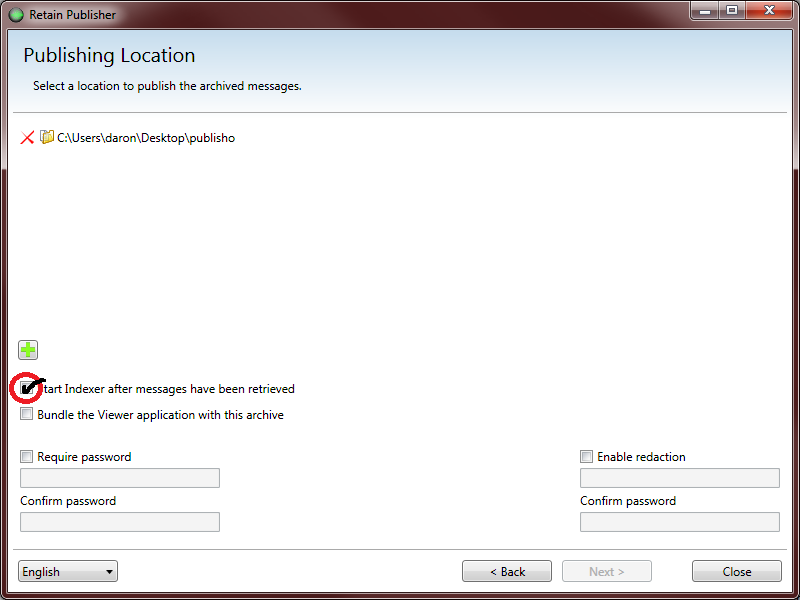
| − | After choosing the location of the Published files, click the box: Start Indexer after messages have been retrieved. At the end of the | + | After choosing the location of the Published files, click the box: "Start Indexer after messages have been retrieved". At the end of the publishing, the Indexer process will automatically start. |
| − | |||
| − | |||
Revision as of 22:58, 6 March 2014
Contents |
Level 1
In the Publisher Training module it was mentioned that, after publishing, the Indexer will kick off automatically if the configuration is set to do so. The Indexer can also be run manually at any time.
In this module you will learn:
- Index Filtering
- Indexing Modes: Automatic or Manual
Index Filtering
In both the automatic and manual processes of the Indexer, there are Indexer Filter Settings. The last screen prior to retrieving messages will allow you to select, or deselect, any types of attachment types you wish to not index. This may be beneficial if you are only searching for a specific type of attachment and wish to leave the others out of your search.
Indexing Setup
As messages get published, they are stored in a SQLite database. When the Viewer is launched it queries the database and displays the messages that have been exported. Within the Retain Viewer, it has the ability to search for messages. This is where the Indexer comes in. Without Indexing the messages, the Viewer will not all you to search for any messages. The option to search will be greyed out. In this case, running the Indexer is the step to take to search.
During the Installation of the Publisher, the Indexer is automatically installed. There is not a separate installation for the Indexer. The Publisher.exe is what needs to be run to index the messages.
There are 2 modes for the Indexer:
- Automatic
- Manual
Automatic
Setting up the automatic indexing happened during the process of selecting the location of where you want your exported messages located.
After choosing the location of the Published files, click the box: "Start Indexer after messages have been retrieved". At the end of the publishing, the Indexer process will automatically start.
3. Indexer Filter Settings.png
The Manual version of the Indexer Filter settings is a button that will allow you to change these settings. Simply click the button, select or de-select your types, and click Close
Manual
If you do not check the automatic option to index after message retrieval, you can still run the indexer on a database manually. After publishing messages, you can launch the Indexer (Start Menu) and point it to the database to index. I twill run the Indexing exactly the same as during the Automatic run.
2. Indexer Start Menu.png
After clicking on the Indexer to launch it will pull up a screen that may contain previously indexed locations, or blank.
4. Manual Index.png
To add a new location, (a database that needs to be indexed) click on the Add location and select the location of where the db is located. You only have to select the parent directory above the db to access the data needed to be indexed. It is important though, that there is a database in the directory structure you are trying to index. Look for the db directory (base.db) to verify that it is the location.
Indexing The Indexing is all automatic, and will run on its own. After selecting location, and filters, click on Start Indexing to being the process. Depending on how many messages it needs to index can take a long time, or go through very quick. As it indexes it will show the current Indexing document it is working on. The bigger the document the longer it will take to process.
5. Indexing.png
Once the indexer is finished, there will be a green checkmark next to the location that signifies it is complete. Click Close to close out of the Indexer.
Troubleshooting: There isn’t much to troubleshooting with the Indexer. It is mostly automatic, and hard coded, so there isn’t much to the configuration except for the filters. At times messages might not be able to get indexed. This is usually caused by issues with the attachment itself. If you do encounter a problem where the Indexer stop, check the Log file (C:\Users\”WindowsUser”\AppData\roaming\GWAVA\Retain Publisher). The log is called Indexer.log and will display all information. The log file will be discussed more in Level 2 of the Indexer Training Module. Since the data we are exporting is already static data on the Retain Server, we don’t have any utilities that will help to fix the message. Looking at the log can identify the problem. Unchecking the filter type for the message that cannot get indexed is the only workaround. Retrieving the attachment from the customer and testing it could lead to a problem with how the Indexer is handling the message, and would need to be submitted to development.

